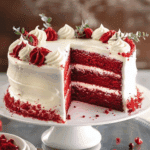
A classic Red Velvet Cake is one of those desserts that never goes out of style. With its deep red hue, moist crumb, subtle cocoa flavor, and the irresistible tang of buttermilk, this cake is always a showstopper. What truly takes it over the top, though, is the ultra-creamy, sweet, and slightly tangy cream cheese icing. I’ve perfected this cake over the years, and I’m finally ready to say: it’s everything a Red Velvet Cake should be.
Why You’ll Love This Recipe
I love how this cake blends the richness of chocolate with the tang of buttermilk for a flavor that’s truly unique. The texture is tender and moist, thanks to using full-fat buttermilk and real butter instead of shortening. The cream cheese icing is dreamy — thick, smooth, and just the right amount of sweet. I also love that this cake looks as festive as it tastes, especially when decorated with sugared cranberries and rosemary for the holidays. But let’s be honest — I’ll make this cake any time of year.
Ingredients
(Here’s a tip: Check out the full list of ingredients and measurements in the recipe card below.)
For the cake:
12 tablespoons unsalted butter, room temperature
1 ½ cups granulated sugar
2 eggs
1 ounce red liquid food color (not gel)
2 tablespoons natural unsweetened cocoa powder
1 teaspoon salt
1 teaspoon vanilla extract
1 cup well-shaken full-fat buttermilk
2 ¼ cups cake flour
1 tablespoon white vinegar
1 ¼ teaspoons baking soda
For the icing:
12 ounces cream cheese, room temperature
12 tablespoons unsalted butter, room temperature
24 ounces powdered sugar
Pinch of salt
1 ½ teaspoons vanilla extract
Directions
To prepare the cake: I preheat my oven to 350°F and grease and flour three 8-inch cake pans. In a large bowl, I cream together the butter and sugar until light and fluffy. Then I add the eggs one at a time, mixing just until the yolk disappears.
In a small bowl, I whisk the red food coloring, cocoa, salt, and vanilla together until smooth. I add that to the butter-sugar mixture and blend on medium-low, scraping down the sides as needed.
Next, I alternate adding the buttermilk and flour: one-third at a time, blending on low and scraping the bowl between each addition. I make sure not to overmix — that’s the key to keeping it tender.
In a cup, I stir the vinegar and baking soda together until it fizzes, then gently fold it into the batter. I divide the batter evenly between the three pans and bake for 18 to 20 minutes, or until a toothpick comes out clean (moist crumbs are fine, just no wet batter). After cooling in the pans for 10 minutes, I turn the layers out onto a wire rack to cool completely.
To prepare the icing: I beat the cream cheese and butter until smooth, then add the powdered sugar and beat until fluffy. I finish with salt and vanilla, mixing until the icing is creamy and spreadable.
To assemble the cake, I use about 2 cups of icing between each layer and frost the outside completely. I refrigerate the cake until ready to serve.
Servings and timing
This recipe makes 10 generous slices.
Prep Time: 20 minutes
Cook Time: 20 minutes
Total Time: 40 minutes
Variations
Sometimes I like to switch things up depending on the occasion. Here are a few ways I vary this recipe:
Cupcakes: I turn this batter into cupcakes by reducing the baking time to about 16–18 minutes.
Layer size: I’ve made this as two 9-inch layers instead of three 8-inch ones. It still works beautifully — just watch your bake time.
Holiday flair: I decorate the top with fresh rosemary sprigs and sugared cranberries for a festive wreath effect.
Natural coloring: If I want to skip artificial coloring, I’ve tried using beet juice. It’s not as vibrant but still gives a natural reddish hue.
Storage/Reheating
I store the finished cake in the refrigerator, covered, for up to 3 days. Before serving, I let it sit at room temperature for 30 to 60 minutes so the icing softens and the flavor shines through. If I need to store just the cake layers, I wrap them tightly and refrigerate or freeze them — though I find freezing can dry the layers slightly, so I prefer making the cake fresh whenever possible.
FAQs
What makes Red Velvet Cake different from chocolate cake?
Red Velvet has less cocoa powder than traditional chocolate cake, so the flavor is more subtle. It also includes buttermilk and vinegar, which create a tangy taste and moist crumb that’s very distinct.
Can I make this cake ahead of time?
Yes, I often make the cake layers a day ahead and keep them wrapped tightly at room temperature or refrigerated. I usually wait to frost it until the day I’m serving.
Do I have to use red food coloring?
Not necessarily. The food coloring gives the cake its signature look, but it doesn’t affect the flavor. I’ve used beet juice for a natural alternative with great results.
Can I freeze this cake?
I’ve frozen the unfrosted cake layers with some success, though I find it slightly dries them out. If I do freeze them, I wrap them very well and only do it for a few days at most. I don’t recommend freezing the frosted cake.
Why is my cake dry?
Dryness can happen from overbaking or using too little fat. I make sure to check the cake at the minimum bake time and use full-fat ingredients like butter and buttermilk for the best texture.
Conclusion
This Red Velvet Cake has truly been a labor of love for me. It’s taken years of tweaking and testing, but I’ve finally landed on a recipe that’s moist, flavorful, and topped with the most luscious cream cheese icing. Whether I’m making it for a birthday, a holiday, or just because, it always hits the mark. After decades of calling it my “Duraflame Cake,” I can finally say I’ve achieved red velvet redemption — and I couldn’t be happier.
This classic Red Velvet Cake is moist, tender, and perfectly balanced with a subtle cocoa flavor and tangy buttermilk. Topped with rich cream cheese frosting, it’s a festive showstopper for any occasion.
Ingredients
12 tablespoons unsalted butter, room temperature
1 ½ cups granulated sugar
2 large eggs
1 ounce red liquid food color
2 tablespoons natural unsweetened cocoa powder
1 teaspoon salt
1 teaspoon vanilla extract
1 cup full-fat buttermilk, well-shaken
2 ¼ cups cake flour
1 tablespoon white vinegar
1 ¼ teaspoons baking soda
12 ounces cream cheese, room temperature
12 tablespoons unsalted butter, room temperature (for icing)
24 ounces powdered sugar
Pinch of salt (for icing)
1 ½ teaspoons vanilla extract (for icing)
Instructions
Preheat oven to 350°F (177°C) and grease and flour three 8-inch cake pans.
Cream butter and sugar until light and fluffy. Add eggs one at a time, mixing just until combined.
In a small bowl, whisk red food coloring, cocoa powder, salt, and vanilla extract until smooth. Mix into butter-sugar mixture.
Alternate adding buttermilk and flour in thirds, mixing on low and scraping the bowl between additions. Do not overmix.
Combine vinegar and baking soda in a cup until it fizzes. Gently fold into the batter.
Divide batter evenly among pans. Bake for 18–20 minutes or until a toothpick inserted comes out clean or with moist crumbs.
Cool in pans for 10 minutes, then turn out onto wire racks to cool completely.
To make the icing, beat cream cheese and butter until smooth. Add powdered sugar and beat until fluffy. Mix in salt and vanilla until creamy and spreadable.
Assemble cake with 2 cups of frosting between each layer. Frost outside and refrigerate until serving.
Notes
For cupcakes, bake for 16–18 minutes instead of using cake pans.
Use two 9-inch pans if preferred—adjust baking time accordingly.
Decorate with rosemary and sugared cranberries for a festive touch.
Use beet juice as a natural food coloring alternative.
Bring cake to room temperature before serving to enhance flavor and texture.


