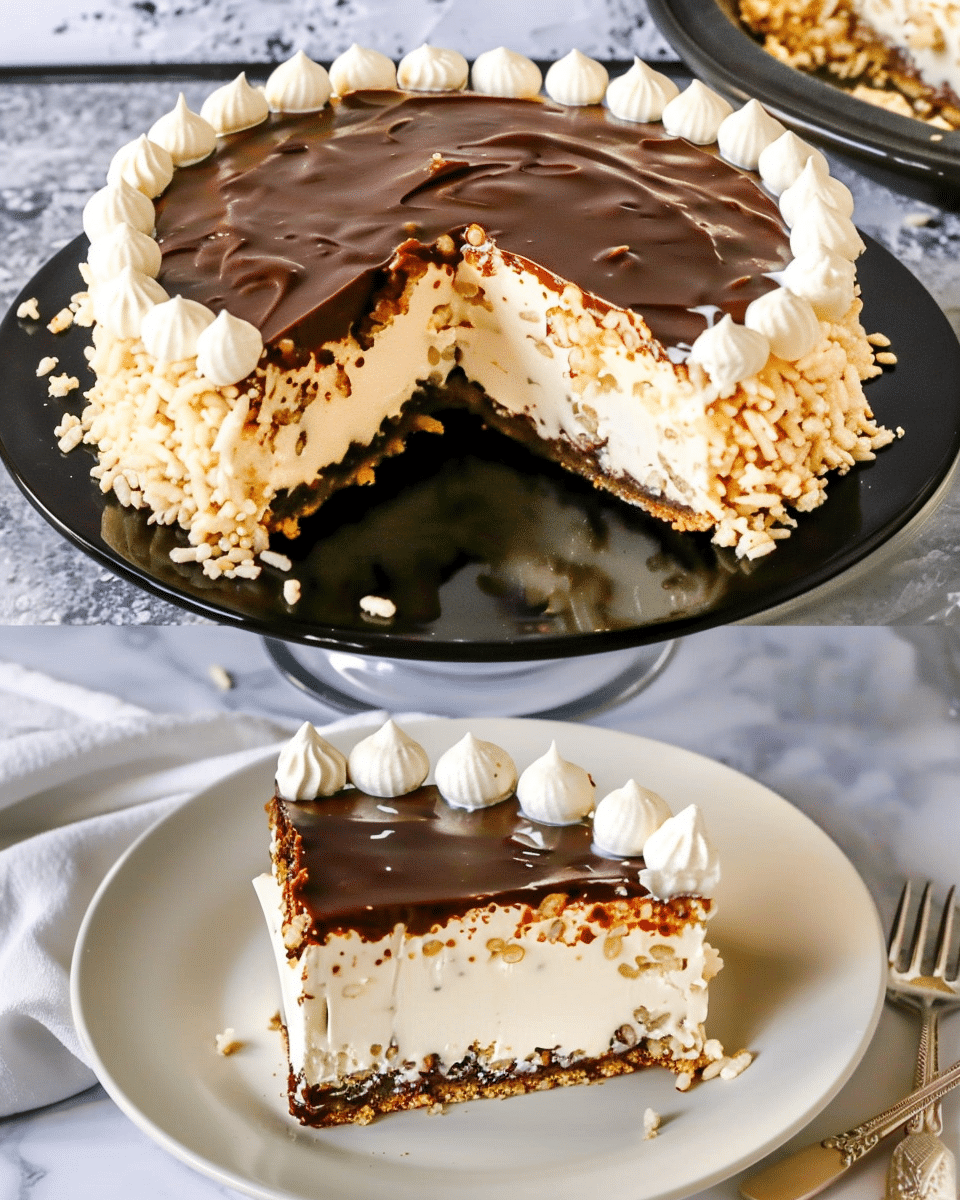
Light, crispy, and creamy — this no-bake cake combines the airy crunch of puffed rice with a smooth, velvety cream layer, all topped with a glossy chocolate finish. It’s a delightful treat that’s easy to prepare and perfect for any occasion.
Why You’ll Love This Recipe
This Creamy Puffed Rice Cake is a showstopper without the fuss. It requires no oven time, making it ideal for quick desserts or warm-weather gatherings. The combination of textures — crisp rice, soft cream, and smooth chocolate — creates a perfectly balanced dessert that melts in your mouth. Plus, it’s easily customizable with your favorite toppings or flavor twists.
Ingredients
(Tip: You’ll find the full list of ingredients and measurements in the recipe card below.)
For the base:
120 g puffed rice (Rice Krispies or similar)
100 g white chocolate
50 g butter
2 tablespoons honey or corn syrup
For the cream:
400 ml milk
2 tablespoons cornstarch
1 tablespoon all-purpose flour
4 tablespoons sugar
1 packet vanilla extract (about 1 teaspoon)
200 ml cream (or whipped cream)
100 g labneh or mascarpone (optional, for thicker texture)
For the topping:
100 g milk chocolate or white chocolate
1 teaspoon vegetable oil
Directions
Prepare the base:
Melt white chocolate, butter, and honey (or corn syrup) together in a heatproof bowl over low heat or in the microwave. Add the puffed rice and mix until evenly coated. Press the mixture firmly into a 22 cm baking pan lined with parchment paper. Chill for about 20 minutes.
Cook the cream:
In a medium saucepan, whisk together milk, cornstarch, flour, sugar, and vanilla. Cook over medium heat, stirring constantly, until thickened and smooth. Remove from heat and let it cool completely.
Finish the cream:
Once the mixture has cooled, add labneh or mascarpone (if using) and mix well. Then add the cream and beat lightly until smooth and fluffy.
Assemble the cake:
Spread the cream evenly over the chilled puffed rice base and smooth the top with a spatula.
Add the topping:
Melt the chocolate with vegetable oil until smooth. Pour it over the cream layer, tilting the pan slightly to spread it evenly.
Chill and serve:
Refrigerate for 3–4 hours (or overnight) until fully set. Slice into squares or bars and serve chilled.
Servings and timing
Servings: 8–10 slices
Preparation time: 20 minutes
Chilling time: 3–4 hours
Total time: About 4 hours 20 minutes
Variations
Nutty version: Add crushed hazelnuts or almonds to the chocolate topping for extra crunch.
Fruit topping: Garnish with sliced strawberries, raspberries, or kiwi before serving.
Dark chocolate lovers: Replace white chocolate with dark or semi-sweet chocolate for a richer flavor.
Coconut twist: Sprinkle shredded coconut over the chocolate before it sets.
Coffee hint: Add 1 teaspoon of instant coffee to the cream layer for a mocha flavor.
Storage/Reheating
Store the cake in an airtight container in the refrigerator for up to 4 days. For longer storage, freeze individual slices for up to 1 month — just thaw in the fridge before serving. This cake is best served cold and does not require reheating.
FAQs
How can I make this recipe dairy-free?
Use dairy-free butter, plant-based milk, and vegan chocolate to make it completely dairy-free.
Can I use dark chocolate instead of white chocolate for the base?
Yes, dark chocolate works just as well, though it will create a deeper flavor and slightly firmer texture.
What can I substitute for labneh or mascarpone?
You can use cream cheese, Greek yogurt, or simply skip it for a lighter cream layer.
Can I make this recipe ahead of time?
Absolutely! Prepare it a day ahead and keep it refrigerated until serving. It actually tastes better once it’s fully set.
How can I make the cream thicker?
Increase the cornstarch by half a tablespoon or use mascarpone for a richer, thicker texture.
Do I need to use a mixer for the cream?
No, but using a hand mixer will make the cream fluffier and smoother.
Can I use flavored puffed rice cereal?
Yes, but keep in mind it will change the flavor — vanilla or honey-flavored ones work best.
Can I skip the chocolate topping?
Yes, you can top it with fruit compote, caramel, or even just whipped cream if you prefer.
How do I prevent the rice base from falling apart?
Press it firmly into the pan and make sure the chocolate and honey mixture coats all the puffed rice evenly.
Can I make this recipe gluten-free?
Yes, use gluten-free puffed rice and ensure all other ingredients, like cornstarch and chocolate, are certified gluten-free.
Conclusion
This Creamy Puffed Rice Cake is the ultimate no-bake dessert — simple to make, beautifully layered, and wonderfully light. Whether you serve it at a family gathering or enjoy it as a weekday treat, its unique combination of crisp and creamy textures makes every bite memorable.
A no-bake dessert featuring a crispy puffed rice base, silky vanilla cream filling, and a glossy chocolate topping. Perfectly layered, light, and irresistibly creamy — ideal for gatherings or a refreshing sweet treat.
Ingredients
For the base:
120 g puffed rice (Rice Krispies or similar)
100 g white chocolate
50 g butter
2 tablespoons honey or corn syrup
For the cream:
400 ml milk
2 tablespoons cornstarch
1 tablespoon all-purpose flour
4 tablespoons sugar
1 teaspoon vanilla extract
200 ml cream (or whipped cream)
100 g labneh or mascarpone (optional)
For the topping:
100 g milk or white chocolate
1 teaspoon vegetable oil
Instructions
Prepare the base: Melt white chocolate, butter, and honey together over low heat or in the microwave. Stir in puffed rice until well coated. Press mixture into a lined 22 cm pan. Chill for 20 minutes.
Cook the cream: In a saucepan, whisk milk, cornstarch, flour, sugar, and vanilla. Cook over medium heat, stirring constantly, until thickened. Let cool completely.
Finish the cream: Add labneh or mascarpone to the cooled mixture and mix until smooth. Add cream and beat lightly until fluffy.
Assemble: Spread cream evenly over the chilled rice base and smooth the top.
Make the topping: Melt chocolate with oil until smooth. Pour over the cream layer and tilt the pan to spread evenly.
Chill: Refrigerate for 3–4 hours or overnight until set. Slice and serve chilled.
Notes
Use a spoon or measuring cup to press the puffed rice layer firmly so it holds together.
Cool the cream mixture completely before adding mascarpone or cream to avoid curdling.
Use a warm knife to slice for cleaner cuts.
For a firmer cream layer, increase cornstarch slightly or use full-fat mascarpone.


